Saturday, December 29, 2012

Crazy Awesome Guilt-Free Spinach Artichoke Dip

Because this dip is made with a silken tofu base and NOT a cheese or cream base, you can eat the entire thing and not feel guilty at all.  It's baked in the oven so it's warm and melty and delicious, and I bet if you bring it to a party and don't tell anyone it's vegan, they wouldn't even know.

Baked Spinach Artichoke Dip

Ingredients:
Dip before going in the oven
-1 small yellow onion, diced
-1 (12 ounce) packages frozen chopped spinach (thawed, drained and squeezed dry)
-1 (8 ounce) jar marinated artichoke hearts, roughly chopped
-1 tablespoon olive oil
-1 (12 ounce) packages firm silken tofu
-1/2 cup nutritional yeast flakes
-3 garlic cloves, roughly chopped
-2-3 tablespoons apple cider vinegar
-1 teaspoon dried basil
-1 teaspoon dried parsley
-1/4 teaspoon cayenne pepper
-1 teaspoon salt
-1/2 teaspoon black pepper

Method:

Preheat oven to 350°F.  Saute onion, spinach and artichoke hearts in olive oil until onion is soft, about 8 minutes.  Blend together tofu, nutritional yeast, garlic, vinegar and spices in blender or food processor until mixed and very smooth.

Combine the smooth base from the blender and the onion/artichoke/spinach mix in a bowl.  Taste and add extra seasonings and nutritional yeast, as needed.  Smooth into non-stick baking dish and bake for 15-20 minutes, or until lightly browned on top.  Serve warm with bread. 

Monday, December 10, 2012

Simple Potato Latkes

These were so easy to make and yielded enough for cute little bite sized appetizers or a meal for 2-3 adults.

Simple Latkes (Potato Pancakes)

Ingredients:
-2 lbs potatoes, peeled and shredded
-1 large yellow onion, peeled and shredded
-1 tsp salt
-1/4 cup flour
-1/2 tsp fresh pepper
-2 tbsp chopped parsley
-1/2 tsp baking powder
-vegetable oil or sunflower oil for frying
-applesauce for garnish!

Method:

Place a colander on top of a large bowl and put the shredded potato and onion in there.  Using your hands, squeeze out as much liquid as possible.  When the mixture is as dry as possible, transfer it to another bowl and add the flour, baking powder, salt, pepper and parsley.  Mix thoroughly.

Meanwhile, preheat the oven to 275F.  Place a large skillet with about ½” of oil on the stovetop over medium heat.  Once the oil is hot, take a heaping tablespoon of the latke mixture into your hands and lightly flatten it into a disc.  Place it lightly into the oil and repeat.  I put about 4 latkes into the oil at once, so as not to overcrowd them.  Let them sit for about 4-5 minutes, until golden on the side which is down, then flip gently and let sit for another 4-5 minutes.  

When they’re done, transfer to some paper towels to absorb some of the oil, then transfer to an oven-safe dish and put in the oven to keep warm.  Keep this up in batches.

Serve with applesauce and a garnish of parsley!

Thursday, December 6, 2012

Vodka-Dijon Mustard Roasted Potatoes

These were some of the best roasted potatoes I have ever eaten.  I guarantee they are different than almost any you have eaten either.  I adapted the recipe from the New York Times’ recipe which they included in their 2011 Vegetarian Thanksgiving series.

Vodka Dijon Roasted Potatoes

Ingredients:
Crusty Delicious Goodness
-2 lbs. roasting potatoes of your choice (I used red-skinned), with skin on and cut into 1” chunks
-1/3 cup + 1 tbsp. Dijon mustard
-1/3 cup extra virgin olive oil
-2 tbsp. vodka
-1 tbsp. dry vermouth
-1 ½ tbsp. horseradish
-2 cloves garlic, pressed
-1 tsp. paprika
-1 tsp. kosher salt
-pepper to taste
-1 tsp. caraway seeds (whole seeds, not ground)
-1/4-1/2 tsp. cayenne pepper
-1 tsp. dried red pepper flakes

Method:

Preheat oven to 400F.  In a large bowl, whisk together all ingredients except potatoes.  Add in the potatoes and toss with your hands to coat.
Potatoes coated with the sauce
Pour the potatoes onto a baking sheet and make sure they are spread out in a single layer.  Roast for 50-55 minutes, tossing with a spatula every 15 minutes or so.  They should be a little crusty on the outside and tender throughout.
Extreme close up!


Cranberry Oatmeal Muffins

This week is so dreary, rainy, and snowy in Germany and I was in the mood for something warming and autumnal.  I had a big bag of frozen cranberries in the freezer so I decided to make these muffins, and they turned out great!  The cranberries definitely are little bursts of tartness because they are real cranberries and not candied or dried ones.  I suppose you could substitute any kind of frozen berry, and also you could add nuts!

Cranberry Oatmeal Muffins

Ingredients:
-2 cups oats
-2 cups almond or soy milk
-2 tsp vanilla
-1 cup flour
-1 cup spelt flour
-1 tsp cinnamon
-2 tsp baking soda
-2 tsp baking powder
-1 tsp salt
-1 cup sunflower oil
-1/2 cup applesauce
-1 cup brown sugar
-1 ½ cups frozen cranberries
-1 cup pecans (optional)

Method:

Preheat oven to 400F.  In a large bowl, mix vanilla and soy milk and let stand for a minute or two.  Then add in the oats and set aside.

In a medium bowl, whisk together the flours, baking soda, baking powder, and cinnamon to thoroughly blend. 

Going back to the milk/oats bowl, add in the oil, sugar, and applesauce and mix to blend.  In batches, add in the dry ingredients to the large bowl, mixing only to blend and not overmixing!  Fold in the cranberries (and nuts if using). 

Fill muffin cups almost to the top, and bake for 20 minutes until the muffin tops have browned slightly.  Makes 24-28 muffins.

Monday, December 3, 2012

Dark Chocolate Peanut Butter Cups with Coconut

If you're like me and like playing around with chocolate and other ingredients for homemade candy around this time of year, you'll enjoy this recipe. So few ingredients and the result is outstanding! For the best results, I highly suggest using a silicone mini-muffin "tin" or at least the little silicone muffin cups fit into your metal muffin tin. Silicone makes the chocolate so easy to pop out once it's set. I would not recommend trying this with just a metal tin, but paper muffin liners may work if you're feeling adventurous.

Dark Chocolate Peanut Butter Cups with Coconut

Finished product
Ingredients:
-1 cup of dark chocolate chips or chopped up dark chocolate
-peanut butter of your choice (I used the Earth Balance coconut peanut butter)
-shredded coconut

Method:

Over a double boiler, melt the chocolate chips until completely melted but not burnt. (Or, you could do this in the microwave very carefully, on a lower setting, stirring frequently so as not to burn.)

Using a small brush or a little espresso or dessert spoon, gently spoon 1-2 tsp of chocolate into each mini-muffin container and, using the spoon or brush, "paint" chocolate up the sides to coat all around each cup form. Then put the whole thing in the fridge for an hour to set.

1st step - chocolate in the molds, set in fridge
After it's solid, take your peanut butter and microwave it very slightly - not so it is liquid-y, but just a little more soft/smooth than usual. Using a teaspoon, fill each muffin cup so that they are now 3/4 full. Then go back to your melted chocolate (mine was still pretty melty but if yours needs another 30 seconds in the microwave, that's fine) and gently spoon the chocolate over each muffin cup right about to the top. Make sure all the peanut butter is covered up.  Then sprinkle a little coconut over each cup into the chocolate.

Ready to go back in the fridge after filling

Return to the fridge and let set for another 60-90 minutes. Pop them out of the molds when done and enjoy! If you're not eating/serving right away it might be best to keep them in a Tupperware container in the fridge.

My New Favorite Product

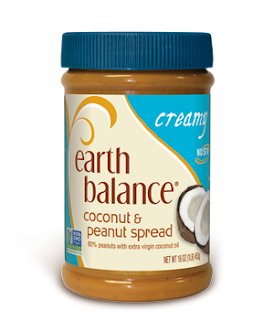
As anyone who knows me well knows, I love peanut butter and have probably a hundred recipes in which I use it.  I recently tried this Earth Balance Coconut Peanut Butter and I LOVE it.  It is just as creamy as non-organic peanut butters like Jif or Skippy, and it has a slight coconutty taste.  It's delicious on bread or toast, delicious in baked goods, and delicious in homemade candy (see tomorrow's recipe!)  And it's gluten-free, GMO-free and organic.

Unfortunately it isn't sold in Germany but if you live in the US, go buy some right now!! And buy some to mail to me!

Photo courtesy of Earthbalancenatural.com

I'm Back! With Coconut Butternut Squash Soup!

Sorry for the long absence - traveling!

I tried this recipe from Sonnet's blog "For the Love of Food" and it turned out great just AS IS! I almost always fool around a little bit with the recipes but I was jetlagged and could barely read straight so I didn't trust myself to not mess it up! The original is here:

Coconut Butternut Squash Soup

Ingredients:
-1 medium butternut squash (peeled and cut into 1" cubes)
-3 tbsp. coconut oil
-1 medium yellow onion, diced
-3 cloves garlic, minced (ok I only used 3 cloves because somebody in my house doesn't like things too garlicky. Original calls for 4 cloves)
-1 can garbanzo beans, drained and rinsed
-5 cups vegetable broth
-1/2 can of coconut milk (be sure to shake can before pouring)

Method:

Preheat oven to 375F, rub squash cubes with 2 tbsp of coconut oil, pour them onto a baking sheet and roast for 35 minutes. 1-2 times in that 35 minutes, take them out and use a spatula to flip them over and turn them around a bit.

Pour 1 tbsp coconut oil into a large soup pout over medium heat and saute the onion for about 5 minutes. Add garlic and saute another 1-2 minutes. Add the roasted squash, beans, vegetable broth and coconut milk and simmer for about 10 minutes.


Remove from heat and let cool a little bit, then pour into a blender in batches and blend completely. When each batch is done, pour into a big bowl. After all the soup has been blended, pour it back into the big pot and put it back on the stove over low heat to keep it warm, and serve!

(An idea: If you like even more beans, after everything is blended add a can of white beans [drained and rinsed] to the soup for a little more chew.)