Because the eggplants looked so beautiful at my produce supplier last week, I bought a ton of them and did several different things. One of the top choices was definitely this baba ganoush. Perfect for a summer patio party or BBQ!
Summertime Roasted Baba Ganoush
Ingredients:
-2 medium/large eggplants (about 2 pounds total)
-1/4 cup tahini
-1/4 cup lemon juice (fresh is best!)
-1 tsp. lemon zest
-2 medium garlic cloves, finely minced
-1/4 tsp. cumin
-1/2 tsp. salt
-1-2 tbsp. fresh parsley
-1 1/2 tbsp. GOOD quality olive oil
Method:
Turn your broiler on high and place the oven rack in the upper third of the oven (so that the eggplants you're about to roast there don't TOUCH the broiler but are within a couple inches). Line a baking sheet with foil and place the eggplants on it. Prick them with a fork a few times to let the steam out. Let them broil for about 3 minutes on the full heat, then (using tongs) flip them to the other side so they can broil 3 minutes on that side too.
Turn off the broiler and turn on the heat to 375F. Keep the eggplants in there and roast for an additional 30-40 minutes, until they're very soft. Take them out and let them cool completely. While they're cooling, mix together the tahini, lemon juice, lemon zest, garlic, cumin, salt, and parsley in a medium bowl. Set aside.
Once the eggplants are cool, split them with a knife and scoop out all the flesh into a strainer. Let the flesh drain but it's ok if there's still a little bit of liquid in the eggplant. (Then discard the skins and liquid.) Mash the eggplant into the tahini mixture with a fork until it's somewhat smooth. Cool to room temperature and serve with pita bread or crackers! (Troubleshooting tip!! If you thought you cooked your eggplants enough but when you are mashing the flesh into the tahini it appears as though it's not really combining, it's ok to scoop the whole mess into a food processor and just pulse a couple of times to break it up and combine. Next time just roast the eggplants longer.)
Thursday, June 5, 2014
Monday, May 26, 2014
Hot and Sour Eggplant
This dish took WAY less time than I imagined... so quick and easy! This amount will serve 3-4 as an appetizer and 2 as an entree, especially with rice or a salad.
 Ingredients:
-2 medium eggplants, trimmed and sliced lengthwise into eighths and then once halfwise
-1 tbsp sesame oil
-1 tsp cornstarch
-1 tbsp sambal olek chili sauce (you can also use Sriracha, but then lessen the sugar a bit because it has more sugar than sambal olek)
-1 small clove garlic, diced finely
-3/4 tbsp sugar
-1 1/2 tbsp soy sauce
-1 1/2 tbsp rice vinegar
-1/4 tsp ground ginger
-1 scallion, finely sliced
Method:
After slicing the eggplant, put all the slices into a large bowl of warm water, heavily salted. If you need, place a salad plate or something over the slices so they are immersed in the water as much as possible. Meanwhile, put your wok on the stove on high and dice your scallions.
In a bowl, mix the following together with a fork: cornstarch, sambal olek, garlic, sugar, soy sauce, rice vinegar, and ginger. Make sure the cornstarch is dissolved and not clumpy. Then drain the eggplant and put the slices onto a paper towel to dry, with more paper towels on top. Thoroughly pat dry all the pieces.
When your wok is very hot, add 1/2 tbsp of the sesame oil and then throw in the eggpant slices (carefully!). Using a wooden spoon, toss the eggplant around a bit so they brown nicely and don't burn. After about 5 minutes they should be soft and smell really nice. If they are getting too dry, add in the other 1/2 tbsp of sesame oil. Then pour in the sauce you just made and the scallions and stir/toss for about 2 minutes until thoroughly coatedand the sauce is thick.
Pour the whole thing onto a serving plate and serve hot! You can sprinkle some sesame seeds on top for garnish.
Ingredients:-2 medium eggplants, trimmed and sliced lengthwise into eighths and then once halfwise
-1 tbsp sesame oil
-1 tsp cornstarch
-1 tbsp sambal olek chili sauce (you can also use Sriracha, but then lessen the sugar a bit because it has more sugar than sambal olek)
-1 small clove garlic, diced finely
-3/4 tbsp sugar
-1 1/2 tbsp soy sauce
-1 1/2 tbsp rice vinegar
-1/4 tsp ground ginger
-1 scallion, finely sliced
Method:
After slicing the eggplant, put all the slices into a large bowl of warm water, heavily salted. If you need, place a salad plate or something over the slices so they are immersed in the water as much as possible. Meanwhile, put your wok on the stove on high and dice your scallions.
In a bowl, mix the following together with a fork: cornstarch, sambal olek, garlic, sugar, soy sauce, rice vinegar, and ginger. Make sure the cornstarch is dissolved and not clumpy. Then drain the eggplant and put the slices onto a paper towel to dry, with more paper towels on top. Thoroughly pat dry all the pieces.
When your wok is very hot, add 1/2 tbsp of the sesame oil and then throw in the eggpant slices (carefully!). Using a wooden spoon, toss the eggplant around a bit so they brown nicely and don't burn. After about 5 minutes they should be soft and smell really nice. If they are getting too dry, add in the other 1/2 tbsp of sesame oil. Then pour in the sauce you just made and the scallions and stir/toss for about 2 minutes until thoroughly coatedand the sauce is thick.
Pour the whole thing onto a serving plate and serve hot! You can sprinkle some sesame seeds on top for garnish.
 |
| Eggplant slices before fully cooked - just as I added them to the wok |
Monday, February 10, 2014
Chocolate Mousse Pie - EASY and QUICK!
This mousse pie is no-bake, quick and easy. All you need is a food processor! Super rich and perfect for entertaining.
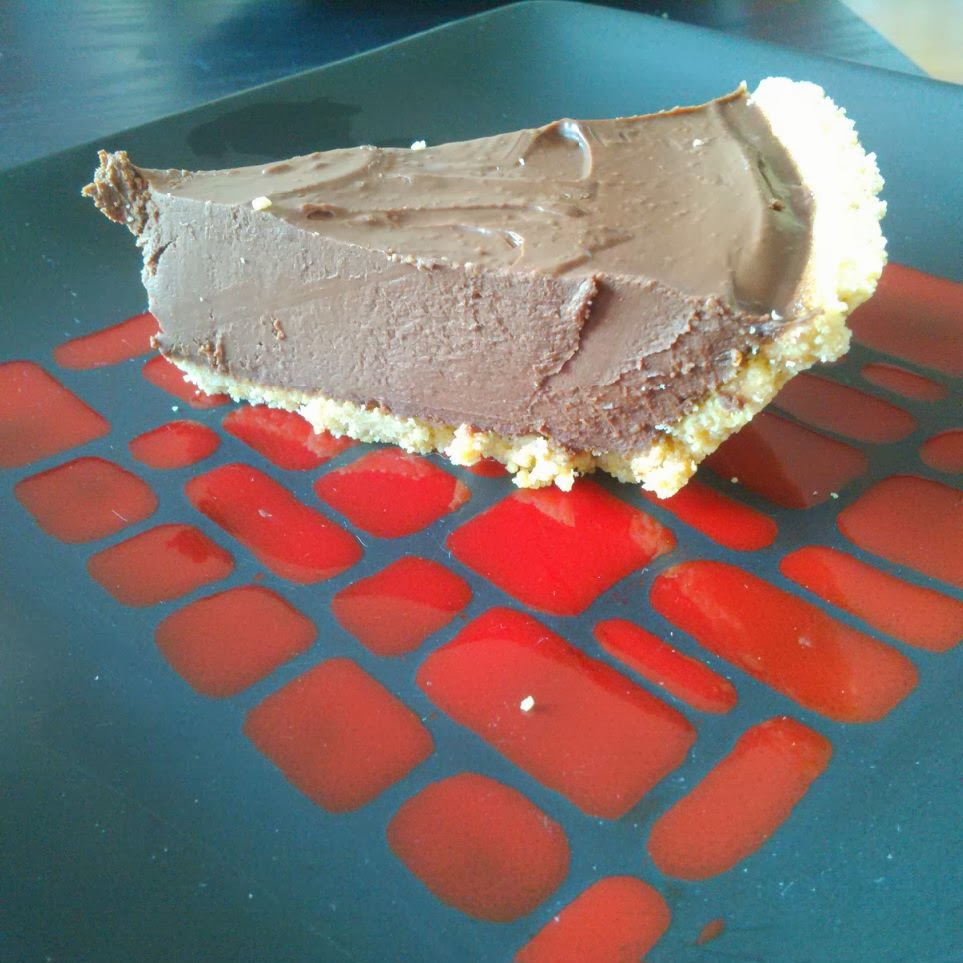 Chocolate Mousse Pie
Ingredients:
-400 g silken tofu (about 1 2/3 cups)
-1 tsp. cocoa powder
-1 tsp. vanilla
-2 tbsp. soy or oat milk
-1/4 tsp. salt
-2 tbsp. coconut cream
-300 g dark chocolate chips (about 1 1/4 cups)
-2 tbsp. agave or maple syrup
-premade graham cracker pie crust
Method:
Preheat oven to 350F. Once hot, insert the crust for about 5-7 minutes just to give it a little golden color. Remove it, and turn off the oven.
In a glass bowl in a microwave set to a medium setting, melt the chocolate chips and the soy/oat milk together. Stir it often, and keep it up til completely melted.
Meanwhile, blend the tofu, cocoa powder, vanilla, salt, agave/maple syrup and coconut cream in a food processor until very smooth. Add in the melted chocolate and blend completely. No such thing as over-blending here!
Pour the mixture into the pie crust and place in the refrigerator for at least 90 minutes. Serve either cold or at room temperature (after chilling). Would be delicious with a berry compote or drizzle!

Chocolate Mousse PieIngredients:
-400 g silken tofu (about 1 2/3 cups)
-1 tsp. cocoa powder
-1 tsp. vanilla
-2 tbsp. soy or oat milk
-1/4 tsp. salt
-2 tbsp. coconut cream
-300 g dark chocolate chips (about 1 1/4 cups)
-2 tbsp. agave or maple syrup
-premade graham cracker pie crust
Method:
Preheat oven to 350F. Once hot, insert the crust for about 5-7 minutes just to give it a little golden color. Remove it, and turn off the oven.
In a glass bowl in a microwave set to a medium setting, melt the chocolate chips and the soy/oat milk together. Stir it often, and keep it up til completely melted.
Meanwhile, blend the tofu, cocoa powder, vanilla, salt, agave/maple syrup and coconut cream in a food processor until very smooth. Add in the melted chocolate and blend completely. No such thing as over-blending here!
Pour the mixture into the pie crust and place in the refrigerator for at least 90 minutes. Serve either cold or at room temperature (after chilling). Would be delicious with a berry compote or drizzle!
Thursday, February 6, 2014
Onion Jam
This onion compote is delicious and super easy to make. Also makes your house smell great! It's great on toast, or on top of a bean spread, or piled into endive leaves. Enjoy!
Onion Jam
 Ingredients:
-1 tbsp. olive oil
-1 lb. onions (I mixed red, yellow, and shallots), all sliced thinly
-2 tbsp. brown sugar
-2 tbsp. red wine vinegar
-1/3 cup dry red wine
-1/8 cup water
-salt and pepper
Method:
In a large skillet over medium, heat the oil. Once hot, add onions and saute for 5-8 minutes. Sprinkle with salt and pepper, then cover and cook for an additional 5 minutes (stirring often) until the onions are slightly brown.
 Add the sugar and stir until it's dissolved. Add the vinegar and bring to a boil, stirring. Add wine and continue to boil and stir. Add the water and cook, uncovered, until most of the liquid has evaporated and it's become thick (about 5 minutes), continuing to stir. Taste and see if you like more salt and pepper, then put in a jar and let it cool. Store in refrigerator.
Onion Jam
Ingredients:-1 tbsp. olive oil
-1 lb. onions (I mixed red, yellow, and shallots), all sliced thinly
-2 tbsp. brown sugar
-2 tbsp. red wine vinegar
-1/3 cup dry red wine
-1/8 cup water
-salt and pepper
Method:
In a large skillet over medium, heat the oil. Once hot, add onions and saute for 5-8 minutes. Sprinkle with salt and pepper, then cover and cook for an additional 5 minutes (stirring often) until the onions are slightly brown.
Monday, January 27, 2014
Scottish Toffee - veganized!
This toffee, once finished, looks beautiful and makes a great gift. But it's incredibly easy, and only takes a few minutes of active cooking.
VERY IMPORTANT: You will need a candy thermometer!
Vegan Scottish Toffee
 Ingredients:
-1 cup margarine
-1 cup brown sugar
-250 g (or 9 oz) dark chocolate chips
-1 cup crushed almonds
-1 tsp. vanilla
-1 tsp. fine salt
Method:
Preheat the oven to 350F. Spread almonds in a baking/cookie pan (a 9"x13" would be perfect, or 8"x16", make sure it has at least a 2" high rim) and toast in oven for 6-10 minutes, watching carefully. They should be slightly toasted/browned looking and smell nice. Remove from oven and turn the oven off. Pour 1/2 of the almonds into a separate bowl and set aside. Spread the rest of the almonds around the pan evenly.
 Heat a medium saucepan over medium-high heat and mix together the margarine and sugar, stirring constantly. Keep stirring as it bubbles and take the temperature with a candy thermometer at 1-2 minute intervals until the temp is 280-300F (this is the right temp for hard candy which cracks).
Once the toffee is the right temperature, remove from heat and immediately mix in the vanilla and salt. It will boil - keep stirring to combine. Then, immediately pour the toffee into the cookie sheet (evenly). At that point, sprinkle the chocolate chips over the toffee and wait a minute for them to melt, then use a spatula to spread the chocolate out evenly over the toffee (so the toffee is completely covered). Sprinkle the remainder of the almonds over the chocolate, and place the whole pan in the freezer for at LEAST 90 minutes.

Remove from the freezer, twist the pan gently to try and get the candy to separate from the sides, bottom, and up-end the pan onto a cutting board or similar surface. It should come out in on large slab. Then use a knife or your hands to crack it into the sized pieces you desire. I put mine into a little cardboard gift box.
VERY IMPORTANT: You will need a candy thermometer!
Vegan Scottish Toffee
Ingredients:-1 cup margarine
-1 cup brown sugar
-250 g (or 9 oz) dark chocolate chips
-1 cup crushed almonds
-1 tsp. vanilla
-1 tsp. fine salt
Method:
Preheat the oven to 350F. Spread almonds in a baking/cookie pan (a 9"x13" would be perfect, or 8"x16", make sure it has at least a 2" high rim) and toast in oven for 6-10 minutes, watching carefully. They should be slightly toasted/browned looking and smell nice. Remove from oven and turn the oven off. Pour 1/2 of the almonds into a separate bowl and set aside. Spread the rest of the almonds around the pan evenly.
Heat a medium saucepan over medium-high heat and mix together the margarine and sugar, stirring constantly. Keep stirring as it bubbles and take the temperature with a candy thermometer at 1-2 minute intervals until the temp is 280-300F (this is the right temp for hard candy which cracks).Once the toffee is the right temperature, remove from heat and immediately mix in the vanilla and salt. It will boil - keep stirring to combine. Then, immediately pour the toffee into the cookie sheet (evenly). At that point, sprinkle the chocolate chips over the toffee and wait a minute for them to melt, then use a spatula to spread the chocolate out evenly over the toffee (so the toffee is completely covered). Sprinkle the remainder of the almonds over the chocolate, and place the whole pan in the freezer for at LEAST 90 minutes.
Remove from the freezer, twist the pan gently to try and get the candy to separate from the sides, bottom, and up-end the pan onto a cutting board or similar surface. It should come out in on large slab. Then use a knife or your hands to crack it into the sized pieces you desire. I put mine into a little cardboard gift box.
Thursday, January 16, 2014
Homemade Herbed Saturday Bread
If you have a food processor, you can make bread with only 5 minutes of hands-on time. But I call this "Saturday bread' because the longer you let it rise before baking, the better it will be. You can put in whatever herbs or fillings you like!! I made mine with chopped red chilies and rosemary.
Homemade Herbed Saturday Bread
 Ingredients:
-1 cup whole wheat flour
-2 1/2 cups white flour
-1 tsp. salt
-2 tsp. active dry yeast
-1 cup (+ a couple tbsp) water
-2-4 tbsp herbs of your choice (or fresh chopped chives, chilies, olives, sundried tomatoes, etc etc! You could really do almost anything here.)
Method:
In the food processor, combine the flours, salt and yeast. With the processor running, slowly pour in the water. It should become the consistency of a only slightly sticky dough ball which turns around and around against the wall of the processor bowl. It definitely should not leave any liquid on the wall. If it isn't sticking together, add 1-2 tbsp water and let it combine again. If by chance you add TOO much water and it gets a bit too sticky, just add 1-2 tbsp flour and mix again. Keep mixing until you get a good bread dough consistency.
(It's hard to describe here but if you YouTube search it, I am sure you'll find a video showing what the right consistency is.)
Take the dough out, knead it just a little bit with your hands, and place it in a bowl and cover it with Saran wrap. Let rise for AT LEAST 2 hours, or up to 5-6 hours. As long as you want, really. I went out and did errands. :)
Uncover the dough and knead a bit - this is the time when you will knead in your herbs/additions. Sprinkle a surface with flour and shape the dough into whatever you want - 1 large boule, a baguette, smaller boules, individual-sized rolls, etc. Put onto a floured surface and cover with a tea towel and let rise again, for at least an hour but up to 3-4 hours.
When you're ready, preheat the oven to 400F, preferably with a pizza stone in there. If you don't have a pizza stone, that's ok. Once the oven is preheated, transfer the dough to a pizza stone or onto a metal baking tray dusted with flour. Using a sharp knife, slice 1-2 lines into the top (only a bit less than 1 cm deep), then pop into the oven. Lower the heat to 375F.
Bake 25-45 minutes, or until the crust is golden and the internal temperature of the bread is 210F. (You can use a meat thermometer for this.)
Enjoy warm!

Homemade Herbed Saturday Bread
Ingredients:-1 cup whole wheat flour
-2 1/2 cups white flour
-1 tsp. salt
-2 tsp. active dry yeast
-1 cup (+ a couple tbsp) water
-2-4 tbsp herbs of your choice (or fresh chopped chives, chilies, olives, sundried tomatoes, etc etc! You could really do almost anything here.)
Method:
In the food processor, combine the flours, salt and yeast. With the processor running, slowly pour in the water. It should become the consistency of a only slightly sticky dough ball which turns around and around against the wall of the processor bowl. It definitely should not leave any liquid on the wall. If it isn't sticking together, add 1-2 tbsp water and let it combine again. If by chance you add TOO much water and it gets a bit too sticky, just add 1-2 tbsp flour and mix again. Keep mixing until you get a good bread dough consistency.
(It's hard to describe here but if you YouTube search it, I am sure you'll find a video showing what the right consistency is.)
Take the dough out, knead it just a little bit with your hands, and place it in a bowl and cover it with Saran wrap. Let rise for AT LEAST 2 hours, or up to 5-6 hours. As long as you want, really. I went out and did errands. :)
Uncover the dough and knead a bit - this is the time when you will knead in your herbs/additions. Sprinkle a surface with flour and shape the dough into whatever you want - 1 large boule, a baguette, smaller boules, individual-sized rolls, etc. Put onto a floured surface and cover with a tea towel and let rise again, for at least an hour but up to 3-4 hours.
When you're ready, preheat the oven to 400F, preferably with a pizza stone in there. If you don't have a pizza stone, that's ok. Once the oven is preheated, transfer the dough to a pizza stone or onto a metal baking tray dusted with flour. Using a sharp knife, slice 1-2 lines into the top (only a bit less than 1 cm deep), then pop into the oven. Lower the heat to 375F.
Bake 25-45 minutes, or until the crust is golden and the internal temperature of the bread is 210F. (You can use a meat thermometer for this.)
Enjoy warm!
Friday, January 10, 2014
Hearty Pumpkin-Chipotle Soup
I love soups which are thick and creamy, but omit the cream! This one achieves that with the addition of white beans. You can use a hand blender for this recipe but I just put it in the regular blender in 2 batches and then put it (blended) back on the stove.
Hearty Pumpkin-Chipotle Soup
Ingredients:
 -2 tbsp. olive oil (I like pepper-infused, but regular is fine)
-1 medium yellow onion, chopped
-3 large garlic cloves, chopped
-2 tsp. chipotle Tabasco sauce
-1 1/2 tsp. chipotle powder
-3/4 tbsp. cumin
-3/4 tbsp. dried oregano
-4 cups vegetable broth
-1 can (15 oz.) pumpkin puree (make sure it's only pumpkin, not "pumpkin pie mix" with spices)
-1 can white beans, drained and rinsed
-1 tbsp. red wine vinegar
-1 tbsp. honey
Method:
Warm the olive oil in a large pot over medium heat; once hot, add the onion. Stir for a few minutes until onion is a bit soft. Add in the garlic, Tabasco, chipotle powder, cumin, and oregano. Saute for 2-3 minutes until aromatic.
Add the broth, pumpkin puree, and beans to the pot and stir until combined. Then simmer for 20-30 minutes (uncovered) until your kitchen smells fantastic. Add in the vinegar and honey. At this point, I used a ladle to move about 1/2 of the soup to my blender, and then blended until very smooth. Then pour the blended soup into a bowl and set aside. Repeat with the remaining soup.
Pour it all back into your pot and keep it warm until ready to serve. You can top with another sprinkle of chipotle powder or with paprika!

Hearty Pumpkin-Chipotle Soup
Ingredients:
-2 tbsp. olive oil (I like pepper-infused, but regular is fine) -1 medium yellow onion, chopped
-3 large garlic cloves, chopped
-2 tsp. chipotle Tabasco sauce
-1 1/2 tsp. chipotle powder
-3/4 tbsp. cumin
-3/4 tbsp. dried oregano
-4 cups vegetable broth
-1 can (15 oz.) pumpkin puree (make sure it's only pumpkin, not "pumpkin pie mix" with spices)
-1 can white beans, drained and rinsed
-1 tbsp. red wine vinegar
-1 tbsp. honey
Method:
Warm the olive oil in a large pot over medium heat; once hot, add the onion. Stir for a few minutes until onion is a bit soft. Add in the garlic, Tabasco, chipotle powder, cumin, and oregano. Saute for 2-3 minutes until aromatic.
Add the broth, pumpkin puree, and beans to the pot and stir until combined. Then simmer for 20-30 minutes (uncovered) until your kitchen smells fantastic. Add in the vinegar and honey. At this point, I used a ladle to move about 1/2 of the soup to my blender, and then blended until very smooth. Then pour the blended soup into a bowl and set aside. Repeat with the remaining soup.
Pour it all back into your pot and keep it warm until ready to serve. You can top with another sprinkle of chipotle powder or with paprika!
Tuesday, January 7, 2014
Decadent Vegan Chocolate-Coconut Truffles
These truffles are so easy to whip up, and so rich and delicious, you only need one to satisfy. :)
Vegan Chocolate-Coconut Truffles
 Ingredients:
-1 1/4 cup dark chocolate chips
-1/8 cup + 2 tbsp. almond or soy milk
-1/8 cup + 2 tbps. graham cracker or cookie crumbs (finely ground)
-1/8 cup unsweetened cocoa powder
-1/8 cup + 2 tbsp. coconut rum
-coconut shavings for rolling
Method:
Melt the chocolate chips and almond milk in a double boiler, or in the microwave (on low heat, stirring after every 10-15 seconds to make sure it doesn't burn). Once creamed together, add in the cocoa powder and mix well (no clumps). Then add in the crumbs and the rum. Once blended, cover and put in the refrigerator for at least 5-6 hours (I left mine in overnight).
 Take the mix out of the fridge and use a spoon to scoop out a heaping tablespoon of the chocolate. It should be pretty hard, but that's a good thing so it doesn't melt completely when you roll it into a ball in your hands. Once it's in a ball shape, roll in the coconut shavings (or, if you prefer, powdered sugar or even more unsweetened cocoa powder) and put in mini cupcake liners. Store in the refrigerator until ready to serve.
Vegan Chocolate-Coconut Truffles
Ingredients:-1 1/4 cup dark chocolate chips
-1/8 cup + 2 tbsp. almond or soy milk
-1/8 cup + 2 tbps. graham cracker or cookie crumbs (finely ground)
-1/8 cup unsweetened cocoa powder
-1/8 cup + 2 tbsp. coconut rum
-coconut shavings for rolling
Method:
Melt the chocolate chips and almond milk in a double boiler, or in the microwave (on low heat, stirring after every 10-15 seconds to make sure it doesn't burn). Once creamed together, add in the cocoa powder and mix well (no clumps). Then add in the crumbs and the rum. Once blended, cover and put in the refrigerator for at least 5-6 hours (I left mine in overnight).
Subscribe to:
Posts (Atom)